Monday, October 31, 2011
Owls are a hoot!
When the popularity of owls rose, I wasn't too fond of them. Memories of those ugly macramé owl wall hangings flooded back from my childhood. Mom made a few and I think I even helped, but that didn't make me like them any better.
Today, owls are everywhere and I have grown to adore these big eyed birds of prey.
Although I created mine in traditional colors, they would be adorable in non-traditional colors also. Thinking pinks, purples and greens.
Included free in this eri*doodle blog is a hand drawn template. I was trying to avoid the perfect shapes to add character. Right mouse click and save image as for full resolution and size.
You are welcome to add my blog link to share the freebies with others, but please do not post the image or create links directly to image(s). Of course you cannot resell the images (purchased or free) directly, but you may use them in your own handmade art that is to be sold. These are original eri*doodle designs.
Sunday, October 30, 2011
Spooky titles for Halloween
Before Halloween passes I thought I would give you some titles to add to your pages or crafts.These eri*doodle FREE titles can be printed on letter size paper or smaller and used as is or layer them with coordinating colors of your craft or page.
Words include spooky, scary, boo and frightening. Titles include a little spider, bat and swirls.
I know not everyone participates in Halloween so this week I will also add a Fall Festival title.
You are welcome to add my blog link to share the freebies with others, but please do not post the image or create links directly to image. Of course you cannot resell the images (purchased or free) directly, but you may use them in your own art that is to be sold. These are original eri*doodle designs.
Saturday, October 29, 2011
Inspired by fall colors
The warm autumn palette of papers in my stock seemed to be waiting for me to start designing. Yesterday I notice Mother Nature has just begun displaying a spectacular show of fall colors. Couldn't wait to start designing my fall tree. After finishing this paper piecing tree, I realized how versatile this design can be. I made flowers, leaves and soon hope to add an owl.
If you would like the Klic-n-Kut knk file or a SVG file for Cricut and other cutters I am offering it for
You are welcome to add my blog link to share the freebies with others, but please do not post the image or create links directly to image. Of course you cannot resell the images (purchased or free) directly, but you may use them in your own art that is to be sold. These are original eri*doodle designs.
Labels:
Circut,
Clip Art,
flowers,
free,
Klic-N-Kut,
ON SALE,
paper piecing,
SVG,
tree
Friday, October 28, 2011
Shhh, making counterfeit glimmer mist
There is a not so secret secret to adding some glimmer or sparkle to your projects that doesn't involve using glue and glitter as we did in summer camp. Glimmer Mist! That wonderful $7 a bottle that makes everything you spray it on sparkle. It comes in various colors and we must have them all right? Without spending a small fortune, we can. Here is how to make the inexpensive eri*doodle counterfeit version.
Small 2 oz. size sprayers can be found for around a dollar at your favorite super center in travel size bins. You'll need one for every color you wish to make.
You may already have metallic acrylic craft paints in your supplies. If not they are not very expensive and brand hasn't seemed to matter. Here i have silver and rose.
Squeeze approximately a teaspoon of the paint color of your choice into the bottle. Your measurements don't have to be exact.
The next ingredient may also be in your supplies. I used Aleene's Clear Gel Tacky Glue, but any clear glue will do. This acts as an adhesive so the glimmer mist doesn't flake off. Add approximately a 1/8 to 1/4 teaspoon eyeballing amount.
Fill the rest of the bottle with lukewarm water leaving some room at the top. Note: I tried this first with rubbing alcohol and the paint immediately clumped before I could even try it out.
Next replace the sprayer top and shake for several minutes till completely mixed.
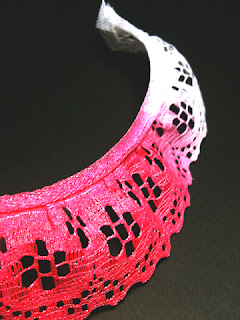
Try a test spray on a scrap before using, add more paint if you desire more color. Water will make your your paper warp so don't over saturate. Allow to dry or use a dryer to speed up the process. When spraying, a shoebox lined with paper towels is recommended to catch overspray. As you see at top picture, this created a good amount of glimmer. Below are the results from the rose color mixture. The eri*doodle glimmer mist knock off was added the flower/rose from our earlier project and some white lace ribbon. The color took well with the white lace and turned out quite vibrant.
This can be used to add glimmer to just about anything such as paper or card stock, silk or paper flowers, fabric, ribbbon and even chipboard. Use it with stencils or masks to create a glimmer design.
Always shake the bottle before each use as the glimmer will settle at the bottom rather quickly.
Make a few bottles with your favorite colors and no one will be able to tell it's eri*doodle counterfeit glimmer mist. We'll keep it between you and me.
Small 2 oz. size sprayers can be found for around a dollar at your favorite super center in travel size bins. You'll need one for every color you wish to make.
You may already have metallic acrylic craft paints in your supplies. If not they are not very expensive and brand hasn't seemed to matter. Here i have silver and rose.
Squeeze approximately a teaspoon of the paint color of your choice into the bottle. Your measurements don't have to be exact.
The next ingredient may also be in your supplies. I used Aleene's Clear Gel Tacky Glue, but any clear glue will do. This acts as an adhesive so the glimmer mist doesn't flake off. Add approximately a 1/8 to 1/4 teaspoon eyeballing amount.
Fill the rest of the bottle with lukewarm water leaving some room at the top. Note: I tried this first with rubbing alcohol and the paint immediately clumped before I could even try it out.
Next replace the sprayer top and shake for several minutes till completely mixed.
Try a test spray on a scrap before using, add more paint if you desire more color. Water will make your your paper warp so don't over saturate. Allow to dry or use a dryer to speed up the process. When spraying, a shoebox lined with paper towels is recommended to catch overspray. As you see at top picture, this created a good amount of glimmer. Below are the results from the rose color mixture. The eri*doodle glimmer mist knock off was added the flower/rose from our earlier project and some white lace ribbon. The color took well with the white lace and turned out quite vibrant.
This can be used to add glimmer to just about anything such as paper or card stock, silk or paper flowers, fabric, ribbbon and even chipboard. Use it with stencils or masks to create a glimmer design.
Always shake the bottle before each use as the glimmer will settle at the bottom rather quickly.
Make a few bottles with your favorite colors and no one will be able to tell it's eri*doodle counterfeit glimmer mist. We'll keep it between you and me.
Thursday, October 27, 2011
Witches pointed hats a fashion trend?
Witch it be this Halloween.
In the 15th Century the pointed hats started out as a fashion trend in London but later only the "pagani", folk women who live in the country wore them. These wise women became known for their use of herbs in their daily lives for healing. Once witches trial started, these women fell suspect to using the "black arts". By Victorian times the hats became a common image associated with witches, which were depicted as old hags.
If you would like to use these free eri*dooodle image, right mouse click and save image as. For FREE svg file Click here
You are welcome to add my blog link to share the freebies with others, but please do not post the image or create links directly to image. Of course you cannot resell the images (purchased or free) directly, but you may use them in your own art that is to be sold. These are original eri*doodle designs.
Wednesday, October 26, 2011
Broken window of a haunted house
My mind rolls around with a great number of ideas for haunted houses. My focus today is on the broken windows.
This is a great window. Once printed, you can cut out the glass part and add your own design or just use as is. The window doesn't have to be on a house at all but on a page floating along with ghosts and chandeliers. This is a great opportunity to add this eri*doodle clip art freebie to your collection. Just right mouse click and save image as.
You are welcome to add my blog link to share the freebies with others, but please do not post the image or create links directly to image. Of course you cannot resell the images directly, but you may use them in your own art that is to be sold. These are original eri*doodle designs.
Tuesday, October 25, 2011
Easy to design paper piecing pumpkin
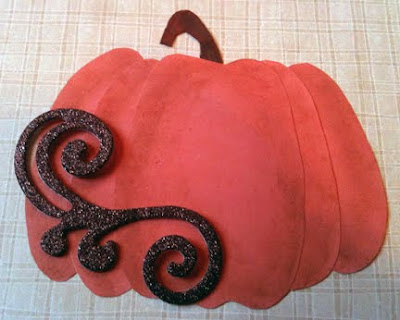
There is something about those funny shaped gourds and pumpkins you find this time of year. Each one seems to have a personality of it's own. In this lesson you will learn how to design your own paper piecing pumpkin. Yes, I said design! Don't worry, these are easy to make and I have also included a FREE eri*doodle template to get you going. These look great gathered up on a page.
What you need:
Paper or textured card stock (best). I used plain orange paper for example.
Pencil
Scissors
Scrapbooking chalks
Glue
Accessories
Step 1: Either save the template (right mouse click) or draw 4 ovals and the simple center shape, see template or photo for the example on this. They don't have to be perfect. We want each to be unique as pumpkin should be.
Get creative! Try other sizes and shapes to make a variety of pumpkins. Short, skinny, fat or round. Anything goes. It's difficult to mess these up. The only thing to remember is the center should be same height as the others or a little larger.
Step 2: Cut them out.
Step 3. Dry placement. No glue just yet. Lets get a feel for how you want to arrange them. Layer them from the ends as they will be your pieces on the bottom. Overlap them as desired. If you need to reshape any, now is the time.
Step 4. Use Scrapbooking chalk to add shadowing around the edges. I used brown here. If you rather, you could wait and glue glitter onto piece after it's assembled.
Step 5. Add glue just along edge that will be covered by overlapping piece. Remember to start at the ends and work towards center.
Step 6. Add stem and accessories such as vines or leaves.
You are welcome to add my blog link to share the freebies with others, but please do not post the image or create links directly to image. Of course you cannot resell the images (purchased or free) directly, but you may use them in your own art that is to be sold. These are original eri*doodle designs.
Monday, October 24, 2011
Meow says the Halloween kitty
Every Halloween page needs a Halloween cat.
I also included in this FREE eri*doodle clip art download some spooky speech bubble. Just add your own word(s). Just right mouse click and save image as.If you would like this to be a digi stamp, shoot me and email or leave a comment.
You are welcome to add my blog link to share the freebies with others, but please do not post the image or create links directly to image. Of course you cannot resell the images (purchased or free) directly, but you may use them in your own art that is to be sold. These are original eri*doodle designs.
Sunday, October 23, 2011
How to make paper flowers
Paper flowers can be expensive to buy. It is very easy to make you own. I have included a free knk and svg file and a .jpg if you don't have a cutter.
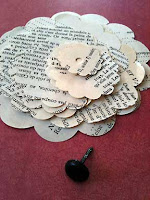
Any paper can be used. Wrapping paper, scrapbook paper or pages from an old book as shown. (I don't normally tear up books, I do have one I work from)
1. Cut out the flower pattern. Many layers works best.
2. Arrange them from largest at bottom to smallest at top. Punch a hole in the middle of each. Doesn't have to be perfectly centered and add brad.
3. Thoroughly wet paper layers with water and carefully pull each layer into center.
4. Carefully open each layer up bending and even squishing the petals down a little.
5. Set aside and allow to fully dry. Flower will stiffen up and hold it's shape.
Here is the free jpg template.
For svg file, download it here
-->
You are welcome to add my blog link to share the freebies with others, but please do not post the image or create links directly to image. Of course you cannot resell the images directly, but you may use them in your own art that is to be sold
.
Saturday, October 22, 2011
Princess costumes a favorite
Free Printable Halloween Princess
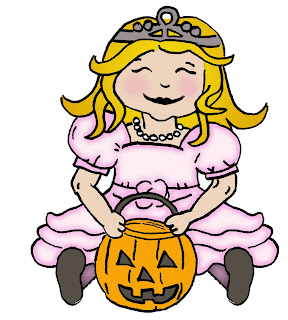
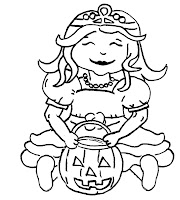
I used to create feature pages for a newspaper. This time each year I designed a page for the top Halloween costumes. Princess costumes make it to the top choice for girls year after year. With that in mind, this morning I decided to draw for the eri*doodle blog this adorable little Halloween princess. She is available for free in both digi stamp and as clip art in color. She is about 5 inches and scales down great. Take advantage of the free downloads by right mouse clicking on the images as save image as.As promised, I am working on making available some free cuter files soon. They will be available in SVG and knk.
You are welcome to add my blog link to share the freebies with others, but please do not post the image or create links directly to image. Of course you cannot resell the images (purchased or free) directly, but you may use them in your own art that is to be sold. These are original eri*doodle designs.
Friday, October 21, 2011
You'll go batty in no time
Bats and free Halloween paper
Some time ago I set out to create some original looking bats for my daughter's Halloween page. Other bats out there just didn't hold the feeling I wanted. They were either too scary or too cute or just plain boring. I wanted cute with just a tad of creepy. What I came up with was making them out of recycled film and sanded them a bit to add stress and wear. The words in the wings, somewhat unreadable added the bit of spook I was looking for. Success! I loved them so much, I scanned them in high resolution so I could print and use them some other time.As I thought about the blog for today, I remembered these little bats. Perfect! I have combined them into a single document and decided to offer the digital file dirt cheap. The largest bat spreads out about 5 inches, but all the bats can be printed much smaller.
For a short time, I am offering these
text bats for .99
File will be emailed to you shortly after payment is made or as soon as I am available to do so.Also for coming to the eri*doodle blog today. I have a free pumpkin paper download. Yay! This page has a white background with small orange brown jack-o-lanterns. Perfect for paper piecings! Page size is 12"X12"
You are welcome to add my blog link to share the freebies with others, but please do not post the image or create links directly to image. Of course you cannot resell the images (purchased or free) directly, but you may use them in your own art that is to be sold. These are original eri*doodle designs.
Thursday, October 20, 2011
What good is a cauldron without a witch? Lets digi stamp one.
If you enjoyed that last project, I have a little (not so little) witch to add to that page.
Below I have added another eri*doodle FREE download. This time a digi stamp. For those of you who don't know what that is, digital stamps or digi stamps are black and white digital images that are downloaded onto a computer where they can be manipulated before printing out. They look much like what you would get if you stamped in black ink. Images can be re-sized and manipulated in other ways and even colored if you prefer before printing it out. There is no physical stamp. A digital stamp is just the image. Can even be used as a coloring page for a child. Designed to print to letter size 8.5X11 or smaller.
If you rather just have one already colored, I have also included the eri*doodle FREE clip art version. Right mouse click to save image.
By the weekend I hope to have a source to post free SVG and KNK's on this blog. :)
You are welcome to add my blog link to share the freebies with others, but please do not post the image or create links directly to image. Of course you cannot resell the images directly, but you may use them in your own art that is to be sold. These are original eri*doodle designs.
Wednesday, October 19, 2011
Bubble, bubble "FOIL" and trouble
So my title was a play off of a line in Macbeth. Yes, I know it's "Double, double, toil and trouble." I just couldn't resist. Seemed perfect.
In the spirit of this time of year, I have added the following foiling technique to a witch's brew of course. I ran into a little trouble while making my brew. Watch the video instructional slideshow.
You will need the following items for this project.
FREE eri*doodle cauldron printed onto cardstock
Clear Acetate, report covers work great too.
Foil from the kitchen.
Brayer to roll it down with
X-Acto or scissors
Sharpie markers in your favorite brewing colors
Rubbing alcohol 91%
Cotton balls
Adhesive of your choice, spray is best
White or light colored pencil
Googly eyes in various sizes
Accessories of your choice
You are welcome to add my blog link to share the freebies with others, but please do not post the image or create links directly to image. Of course you cannot resell the images directly, but you may use them in your own art that is to be sold.
Tuesday, October 18, 2011
Simple Jack-o-lantern goodie bag
This has happened to me on many occasions, a last minute situation that you need a simple goodie bag for the kids or work? Here is a quick and simple Halloween themed paper bag for your Halloween goodies. Would also be cute to send kids lunch in.All you need is
The eri*doodle FREE Jack-o-lantern high resolution download.
A lunch size paper bag
A hole punch smaller than size of ribbon width
Ribbon
Scissors
Glue stick or double side tape
Goodies of your choice.
Tag optional
Print on cardstock and cut around one of the pumpkins / Jack-o-lanterns (below)
While bag is flat, glue or double stick tape pumpkin to bag
Open bag and place goodies inside.
Fold over top of bag about 1.5 inches
Punch two holes for ribbon
Feed ribbon through holes
Attach optional tag
Tie a bow
You are welcome to add my blog link to share the freebies with others, but please do not post the image or create links directly to image. Of course you cannot resell the images directly, but you may use them in your own art that is to be sold.
Monday, October 17, 2011
The cutter behind the fairy wings
About the time Cricut popped up, I took a look at cutters and choose to go with the Klic-N-Kut MAXX 24". There were some big dreams going on there to buy one so large, but as an artist, I just can't have limitations. :) Mainly, I choose the Klic-N-Kut for two reasons, one, I could design my own work and second because the power. It can cut through thicker stock. Just to be clear, I am also a fan of Cricut especially since you can now use .SVG files. It has some great cartridges too. For those of you not familiar with using SVG files on their Cricut or other cutter, take a look at Sure Cuts Alot Thier site.
They have a Sure Cuts Alot 3 for Craftwell eCraft™, Black Cat Cougar/Lynx™, BossKut Gazelle™, Pazzles Inspiration, Silhouette SD™, USCutter™, Craft ROBO/Graphtec™ and Wishblade™. Note: Sure Cuts ALot 2 works on the Cricut.
For Klic-N-Kut, you can visit their site here scrapbookdiecutter.
Here is an example of some very large, delicate, tattered fairy wings I designed for the cutter. They span 7.5" X 10.5". These wings are meant to be used large due to the intricate details in the cutting. I envisioned these wings to be used not only for scrapbooking but mounted on a fairy doll (for display only) perhaps cut out of thin metal, acetate or cardboard stock (recommended). They could also be used as butterfly wings or even a dark fairy when cut in black.
There are three parts to the wings that can be use all together or separately. One is a solid cut for the peep-a-boo background.
Displayed in the photo with the fairy, I used the top wings, colored then and glittered them and folded them in half. They came out gorgeous! Photo does not do them justice. The other image is to give you an idea of the layers.
Buy the SVG or KNK Wings1 file
Sunday, October 16, 2011
A little Halloween Whimsy
Whimsical tree and paper
With Halloween right around the corner I thought a bit of whimsy was in order. I have come up with four freebies for today. I know not everyone uses digital papers, but personally I have been adding them into my collection and printing them to use with paper piecings. Included free for personal use only are Halloween colors in my own personal design. Created just today! Size is 300 dpi 12"X12". Right mouse click on image as save as.
I thought the perfect addition to the papers is this whimsical tree. Imagine hanging pumpkins, or bats on this tree, adding a fence with some trick-or-treaters running about. This tree isn't limited to Halloween, how about a winter wonderland? It was designed to be used large, but can be reduced as small as you dare. Original size is 7" wide X 10.25 tall. Great for 12X12" pages.
Whimsical Tree svg cutter file can also now be purchased from the eri*doodle blog
You are welcome to add my blog link to share the freebies with others, but please do not post the image or create links directly to image. Of course you cannot resell the images directly, but you may use them in your own art that is to be sold.
Labels:
Circut,
cutter,
digital paper,
free,
Halloween,
Klic-N-Kut,
ON SALE,
SVG,
to buy,
tree
Subscribe to:
Posts (Atom)