
 There is something about those funny shaped gourds and pumpkins you find this time of year. Each one seems to have a personality of it's own. In this lesson you will learn how to design your own paper piecing pumpkin. Yes, I said design! Don't worry, these are easy to make and I have also included a FREE eri*doodle template to get you going. These look great gathered up on a page.
What you need:
Paper or textured card stock (best). I used plain orange paper for example.
Pencil
Scissors
Scrapbooking chalks
Glue
Accessories

Step 1: Either save the template (right mouse click) or draw 4 ovals and the simple center shape, see template or photo for the example on this. They don't have to be perfect. We want each to be unique as pumpkin should be.
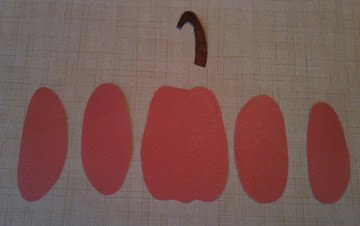 Get creative! Try other sizes and shapes to make a variety of pumpkins. Short, skinny, fat or round. Anything goes. It's difficult to mess these up. The only thing to remember is the center should be same height as the others or a little larger.
Step 2: Cut them out.
Step 3. Dry placement. No glue just yet. Lets get a feel for how you want to arrange them. Layer them from the ends as they will be your pieces on the bottom. Overlap them as desired. If you need to reshape any, now is the time.


Step 4. Use Scrapbooking chalk to add shadowing around the edges. I used brown here. If you rather, you could wait and glue glitter onto piece after it's assembled.
Step 5. Add glue just along edge that will be covered by overlapping piece. Remember to start at the ends and work towards center.
Step 6. Add stem and accessories such as vines or leaves.
You are welcome to add my blog link to share the freebies with others, but please do not post the image or create links directly to image. Of course you cannot resell the images (purchased or free) directly, but you may use them in your own art that is to be sold. These are original eri*doodle designs.
No comments:
Post a Comment
A big eridoodle hug for your comment.